5 Steps to take before confirming that Friend Request on Facebook
I may have items I use and love on this page. If you take action (I.e. make a purchase) after clicking one of the affiliate links, I’ll earn some coffee money ☕️ (at no additional cost to you). See our terms for more info.
I’m one of those people that don’t like confrontation, don’t want to hurt other people’s feelings and want to be friends with everyone so I accepted the majority of the Friend Request I received. (The older I get the more I realize you can’t please everyone and definitely can’t trust everyone) 🙂
Today you just can’t do that!!
With so many fake profiles, crazy people doing crazy things, spammers, people trying to steal your identity, and just people whose sole purpose is to make other people’s lives a living nightmare you have to be so careful with who you become friends with.
Especially those of you that are 55+ and Senior Citizens. These people prey on those that are in your age bracket because you are new and and just learning all about this Facebook thing. But what they don’t know is that you have an advocate that is looking out for your best interest and that advocate is me. 🙂
The thing is, when you accept/confirm someones friend request on Facebook they are able to view all the information that you have set to allow your friends to see. Things like, where you work, who your friends are, your pictures, videos, your post and your contact information. Now keep in mind that YOU have control over these settings and can determine if you want your “friends” on Facebook to be able to view these. You can find these settings on Facebook under your Privacy Settings & Tools.
There are a lot of different things I look for before I confirm that friend request but I wanted to hear from my own friends what steps they take and the feedback I received was wonderful and what I have used for the following steps.
Very first thing we all do when we receive a friend request is head straight to their Personal Profile and start checking things out.
Watch me as I confirm a friend request
Follow these 5 Steps before confirming a Friend Request
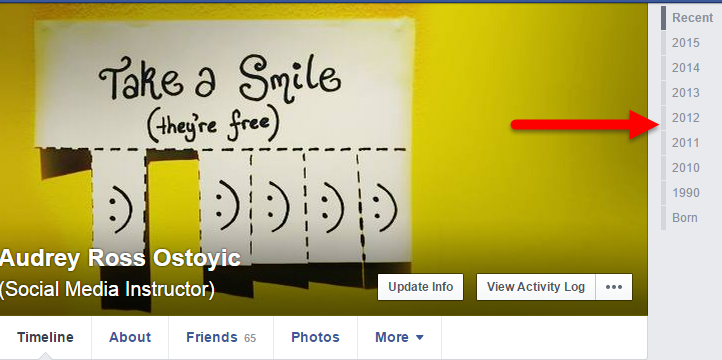
1. When did they create this account – A brand new account is one of the first warning signs that it might be a hacker or spammer. Now granted, I understand that we were all new at one time but these people make fake accounts all day long and just start a friend request frenzy so I just want you to be aware that any new account might just be a fake account.
In order to see if the account was just made you can go to that person’s profile and look to the right of their cover photo. You’ll see Years, click on the oldest year and then look for maybe their first post, when they uploaded their profile picture or anything that will indicate when they joined Facebook.
2. Check your Mutual Friends – When the Friend Request comes in, Facebook will let you know how many Mutual Friends you have and you can actually click on that link to see who your mutual friends are. But while your on their Personal Profile you’ll head to their Friends List then choose Mutual Friends. There, you’ll be able to see any mutual friends you may have in common.
Lots of times, if I receive a friend request from a classmate from High School, I notice a lot of mutual friends we have in common are all from my High School years. This lets me know that they might actually be the person they say they are.
If you do not recognize the person and you have any doubts, it never hurts to reach out to those mutual friends and ask them if they know the person.
3. Photos/Video – You know the saying ‘A Picture is worth a thousand words’ this holds so true when looking at someones photos.
First of all, I’m looking at the people who are in the photos, do I recognize again?
I’m looking at where it was taken. I’m looking at how many photos do they have uploaded? The reason for counting the photos is because a lot of times fake profiles will grab a couple photos from a real profile and throw those up to make it look like it’s that person.
A lot of times it will be photos of just that one person without anyone else in the picture. If they have videos uploaded of themselves I’ll watch them and see if I recognize them or anyone else in the videos.
4. What sort of stuff is on their Timeline – Some people lock down their Timeline and do not allow people who are not their friends to view it. But some people leave their Timeline wide open for anyone and everyone on Facebook to see it.
If they do have it set for everyone to see then I’m looking at photos, videos and post they have been tagged in. I’m looking at any life events they may have posted, what sort of movies they watch and books they read and sometimes I’ll go as far as to see what sort of Business Pages they have “Liked” on Facebook.
5. Take a peak at their About Section – Look at the About Section of a person’s profile before you confirm the friend request.
Of course the about section can only be viewed if that person has it set for non friends to view it. If you are able to view it and presuming that they filled it out, you can find out where they work, where they were educated (High School and/or College), places they have lived, their contact and basic information and even their family and relationships on Facebook.
What about you? Are there other steps you take before you confirm a friend request?
Let me know in the comments below and as always if you have any questions let me know and I’ll do my best to answer them for you.
Be Blessed,
Audrey

About the Author
Audrey Ostoyic has been guiding Seniors and Baby Boomers through the intricacies of social media since 2013. With a passion for technology and a talent for teaching, Audrey simplifies new and often overwhelming digital worlds into easy, understandable steps. Her expertise helps users connect with friends and family effortlessly, without the usual frustration that technology can bring.

this awesome! i will be sharing this with everyone, and beg them to read it! thank you for sharing! èlizabeth ?