How to change Profile Picture and Cover Photo on Facebook
I may have items I use and love on this page. If you take action (I.e. make a purchase) after clicking one of the affiliate links, I’ll earn some coffee money ☕️ (at no additional cost to you). See our terms for more info.
In this video tutorial I’ll walk you through the steps of uploading or updating both your profile picture as well as your cover photo on Facebook.
Uploading/ Updating a Profile Picture
Whether you are uploading your first profile picture or changing it out, you will take the same steps for each of these tasks.
1. Head over to your profile by clicking on your photo and name at the top of your account.

2. Mouse over your profile picture and click on Update Profile Picture. (Do Not Click on the picture itself! That will only take you to the picture and not allow you to update the picture)
3. Once you click on that Facebook gives you three options to choose from: Upload a Photo (from your computer), Take a Photo (have to have a camera attached to your computer) or Choose from Photos that are already on Facebook.
Choose the photo you want to upload and then click save.
Uploading/ Updating a Cover Photo
Crazy as it sounds I have had more people ask me how to change their cover photo then I ever thought possible. Of course when I show them they can’t believe they didn’t figure it out on their own.
1. Mouse over the Camera Icon located at the top left of your cover photo. When you do that it will say Update Cover Photo, click on that and then you are asked if you want to Choose from My Photos (these are photos you already have on Facebook), Add Synced Photo (these are photos you have synced from your phone to Facebook) or you can Upload a Photo (from your computer).
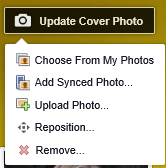
If you already have a Cover Photo you can also reposition it or remove it altogether.
Once you have an image selected click Save Changes and your Cover Photo has now been updated.

About the Author
Audrey Ostoyic has been guiding Seniors and Baby Boomers through the intricacies of social media since 2013. With a passion for technology and a talent for teaching, Audrey simplifies new and often overwhelming digital worlds into easy, understandable steps. Her expertise helps users connect with friends and family effortlessly, without the usual frustration that technology can bring.